

I've noticed in the ON1 Facebook groups that there are several new users asking about workflow in ON1 Photo Raw - presumably refugees from other systems. Having used ON1 almost exclusively since early 2019, I feel qualified to share my workflow in the hope that it helps some. The workflow is tried and tested and has been thoroughly optimised for me.
The following is based on ON1 Photo Raw 2024.5. I am predominantly a landscape photographer and I am not at all saying that this is the only way to process in ON1, it is my way (is that enough caveats?) and has proven effective over the last 5 years. I share it here now in the hope that some of the newer users.
This is not an editing tutorial - I have shared a couple of editing tutorials before - check out here and here. This is all about workflow from import to edit to the final jpg that can easily be re-found at any point due to my file-naming system.
Do let me know if you find the workflow helpful or if you have any tips or tricks of your own that you would add.

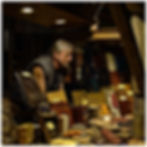
The photos that I've chosen to use to exemplify the process are from an evening spent at the Kaltenberg Jousting Tournament; our 800-person village plays host in July to the world's biggest jousting tournament and the associated medieval market.
A couple of extra tips for easy editing; Under Preferences: General click the radial "Only Adjust Brush Size with Scroll Wheel" - this will allow you to control the brush size with the scroll wheel during editing, and under Preferences: Files select "Apply Lens Correction Automatically" (note: not actually sure whether this actually works as advertised or not, often when editing I select Auto Lens Correction in the Develop tab the image corrects itself).
Import
The first step in the process is importing the photos. I generally do this direct from the cart. Actually, I always do this direct from the card. Using the settings below the original raw files are automatically put into the subfolder User\Pictures\YYYY\MM\DD. As I explain later under Export, this lets me easily find the original images at a later date.
Before you import, I'd recommend using the following settings in preferences: Because I allow AI keywords at the next stage, deselecting Find Faces can accelerate the process.

Here are my import settings. Important here are the Folder, Generate Subfolders, Add Metadata and Photo Settings, where I add a generic preset. This doesn't actually edit the photo at all as I'll explain below under Presets, but will make editing 10x faster later.

Culling
I take a lot of photos. A lot. And culling can take a long time. Again there's a set-up. First you need to check Auto Advance under Photo in Browse mode. This way you can issue a star rating for the files simply by hitting the number keys 1-5. WIth Auto Advance selected, each time you issue a rating, it automatically advances to the next image.
At this stage I issue a "1" to any image that I intend to edit in the next stage, an "x" to images that I want to delete (shots where I left the lens-cap on, blurry shots, missed trigger, etc.).

As I go to the edit stage, I restrict my view to images which are ≥ - the images that I want to at least take a closer look at. First go top right and drop down and select "Filter - * ".

Just one further step here to smooth the process; top left change "=" to "≥", reset the Match rules so they're empty as shown below and under Search: Current Photos check "Lock across search folders". Changing "=" to "≥" means that you will still see all the photos when you elevate the file from " * " - a file of interest to " * * " - a file I later want to Export (i.e. save to jpg).


Presets
I briefly mentioned presets before during the Import process. Normally, when people talk about presets, they're talking about a sophisticated pre-edit that significantly alters the image.
My standard presets do, well, nothing. They don't alter the images at all. What they do do, however, is pre-load my most regularly used editing effects and local brushes. This way, instead of a painful process of adding each filter manually from the Effects panel, all I have to do is click the radial button to turn the pre-loaded effect on. This one thing has had the biggest effect on my editing process in that it speeds everything up significantly.
Oh, and the Camera Profile under Tone & Color in the Develop tab is set to ON1 Landscape.

My one caveat is that every now and then you should revise which effects your preset loads so you don't get stuck in a rut of always using the same old effects.
As well as modified Dodge and Burn brushes in Local, my preset loads all of the following Effects, none of which are selected on at this stage. Note that most of these are not the original Effect names but have been renamed for convenience:
Tone Enhancer: Shadows Lighter
Tone Enhancer: Highlights Darker
Tone Enhancer: Tonal Contrast*
Color Enhancer: Colo(u)r Increase
Curves
Color Enhancer: Color Fall
Color Adjustment
Sunshine
Glow: Orton Clean (50% opacity)
Glow: Angel Glow
Dynamic Contrast
Tone Enhancer: Clarity
Tone Enhancer: Midtone Con Boost
Tone Enhancer: Midtones Lighter
Vignette (Big Softy; 50% opacity)
*Tonal Contrast is one of my all time favourite ON1 filters. I much prefer it to Dynamic Contrast and Clarity as a way to enhance micro-contrast in clouds or distant forests.

Editing
As I mentioned above, this is a workflow tutorial and not an editing tutorial, so I'll keep it short. I lean heavily on the new masking bug if I want to apply Shadows Lighter to the foreground or Highlights Darker to just the sky.
When I've finished my preliminary edit, I generally hit the "2" key to elevate the image from "to edit" to "to export". I rarely use stars for any other purpose, very rarely promoting an image to " * * * " if I'm really happy with it.

Synchronisation
One of the characteristics of event photography is that often you'll want to apply the same edit across multiple images. This can easily be done from the Browse window. Select all the images to be synchronised, super-select the original from which the following images should be taken, right-click on this and then select either Sync Settings, which will bring up a menu allowing you to select which settings to sync, or Sync All Settings, which does what it says on the tin.


Export
The last step in the process is to export the final ** edits to the hard drive. ON1 is a non-destructive editor that doesn't modify the original file - whether raw or jpg. Instead, it saves the editing details in a so-called sidecar file which is automatically saved when you move on to another edit. In order to 'save' the edited photo it has to be exported to a final file format, whether jpg, tiff, png or dng.

ON1 allows batch export and renaming of the final files. In my standard social media export preset, as well as resizing to 2048 pixels on the long edge and saving the images as jpegs at 93% quality, I rename the photos with the prefix YYYYMMDD-[filename] in a separate file. This means that if I want to come back to the original image at a later date for whatever reason, I can immediately see the date the original was taken and because the raw files were saved in a corresponding folder, finding the original is easy.
I like to be able to choose my export folder and have ON1 open this folder when the batch export is finished. I set it to export in the background, though this will have an effect on editing speed. Sharpening is set to Screen Low.

I use a watermark on my social media files which is automatically added to the jpg on export. The final image looks something like this:
